Design Your Own Phone Stand
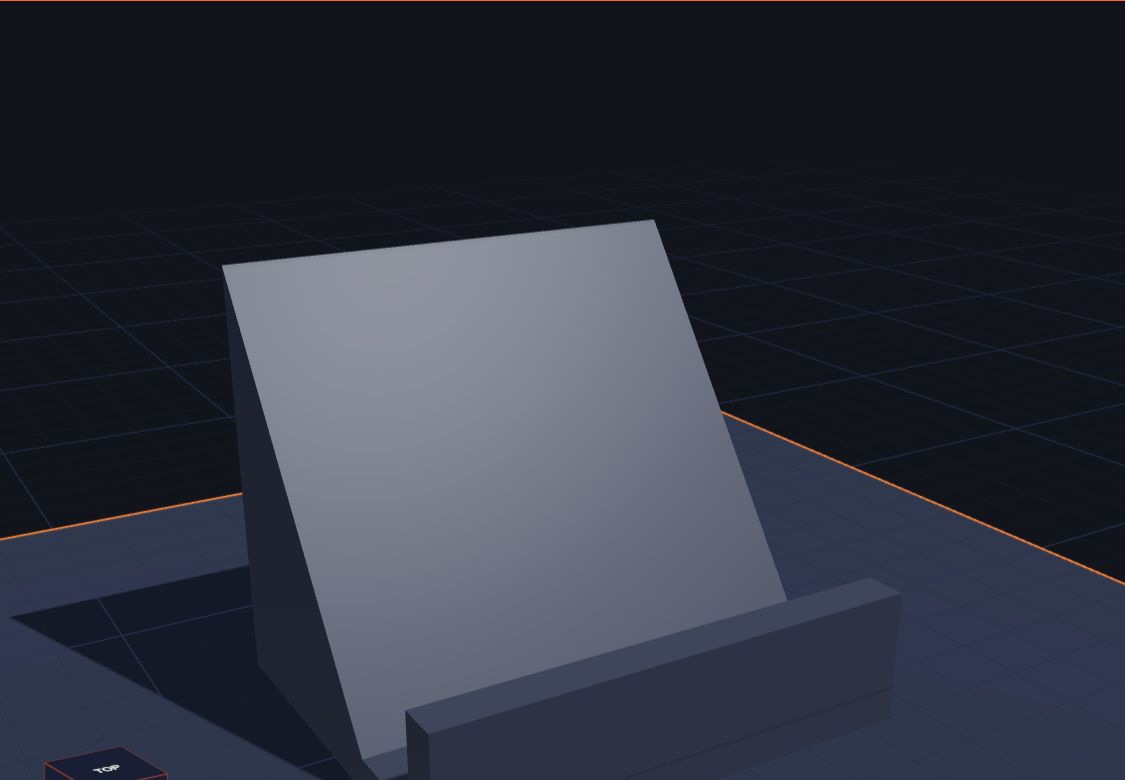
A phone stand holds a phone up so you can watch a video, follow a recipe or video-call grandma without holding it. It's one of the most useful things you can 3D print, and it's easy to design yourself.
In this project you will build a phone stand from just three shapes: a flat base, a ramp to lean on, and a lip to stop the phone sliding off. Then you will measure a real phone and make the stand fit it perfectly. It takes about 15 minutes.
What you need
- Kids 3D Lab (it's free, and you don't need an account)
- A ruler
- A phone or a small tablet to measure (ask a grown-up first!)
How a phone stand works
Before we build, let's think like a designer. A phone stand has three jobs:
- Stay still. It needs a wide, flat base so it doesn't tip over.
- Hold the phone at a good angle. Straight up is too steep. Lying flat is too low. Leaning back a little is just right.
- Stop the phone sliding. A small wall at the front, called a lip, catches the bottom of the phone.
Every part of our design does one of these jobs.
Step 1: Make the base
- Open Kids 3D Lab and click New build.
- Click Box.
- Under Size, set Width to 70, Depth to 60 and Height to 5.
- Pick a colour you like.
This flat slab is the base. It's 7 cm wide, which is wider than most phones, so the stand won't tip sideways.
Step 2: Add the ramp
- Click Ramp. A ramp is tall at one end and slopes down to the other.
- Set Width to 70, Depth to 40 and Height to 55.
- Click the base, hold Shift and click the ramp.
- Click Put on top of the box. The ramp jumps on top of the base, in the middle.
- Now move the ramp towards the back. With the ramp picked, set its Y to 10.
Look at the stand from the side. The ramp is tall at the back and slopes down to the front. The phone will lean against this slope.
Step 3: Add the lip
- Click Box again.
- Set Width to 70, Depth to 6 and Height to 14.
- Click the base, Shift-click the new box, and click Put on top of the box.
- Set the lip's Y to -27. It moves to the very front of the base.
Now there's a gap between the lip and the bottom of the ramp. The bottom edge of the phone sits in that gap.
Step 4: Measure your phone
Our gap is 14 mm. Will your phone fit?
- Ask a grown-up if you can measure their phone. Measure it with its case on.
- Hold a ruler against the side of the phone and read how thick it is. Most phones are between 8 and 12 mm thick with a case.
- If the phone is thicker than 14 mm, you need a bigger gap. Pick the lip and move it further forward, or make the ramp's Depth a little smaller.
Step 5: Check it and save it
- Call your build "Phone stand".
- Click Save.
- Click Export and read the checks in Ready to print? Does it fit on your printer? Is it all one piece?
- Click Download STL.
The angle: why it leans back
Our ramp is 55 mm tall and 40 mm deep. That makes the slope about 55 degrees from the table. A phone leaning at that angle is easy to see when you sit at a table, and it doesn't fall backwards.
Want to try other angles? Change the ramp's Height:
- Taller ramp (70): the phone stands up straighter. Good for video calls.
- Shorter ramp (40): the phone leans back more. Good for reading a recipe while you stand.
Make it even better
Add your name
Click Text and type your name. Set Letter size to 8 and Thickness to 1.5. Put it on the front of the base, below the lip. Now everyone knows whose stand it is!
A charging hole
Many people charge their phone while it's on the stand. Add a Cylinder with Diameter 12, turn it into a Hole, and put it through the lip in the middle. The charging cable can go through it.
Soft edges
Pick each part and set Soft edges to 1. Smooth edges are nicer to touch and look more finished.
A tablet stand
For a tablet, make everything bigger: a base 150 wide, a ramp 150 wide and 80 tall. Check that it still fits on your printer's plate.
Common mistakes
- The gap is too small. Measure the phone with its case. A gap that is 2 mm too small means the phone won't fit at all.
- The parts float. Use Put on top of the box so the ramp and lip sit right on the base.
- The stand tips backwards. If the ramp is very tall, make the base deeper so it stays steady.
- It's too big to print. The Ready to print? box tells you if it doesn't fit your printer.
Questions kids ask
Will it hold a tablet?
This one is made for phones. A tablet is wider and heavier, so make the base, ramp and lip wider, and make the base deeper so it doesn't tip.
How thick should it be?
The base is 5 mm thick, which is strong enough for a phone. Thinner than 3 mm can bend.
Does it need supports when it prints?
No. The ramp slopes gently, and everything is built on a flat base, so it prints without any extra help.
How long does it take to print?
A phone stand is a bigger print, so it usually takes a few hours. The slicer app shows the exact time.
For grown-ups
A phone stand is a real design problem with real constraints: it must fit a specific object, hold it at a useful angle and stay stable. That makes it a great introduction to measuring and to the idea that a design can be tested and improved. Encourage your child to measure the phone, predict whether it will fit, and change one number at a time. If you print it, the example uses quite a lot of plastic; making the ramp hollow, or printing with a lower infill setting in the slicer, saves material. This build is also in the app's examples as Phone stand. For more about sizes, see Millimetres Made Easy.
Keep reading
 Projects
Build a Snowman by Stacking Shapes
Stack three balls, add a carrot nose and a hat. A fun first project that teaches you how to put shapes on top of each other.
5 min read
Projects
Build a Snowman by Stacking Shapes
Stack three balls, add a carrot nose and a hat. A fun first project that teaches you how to put shapes on top of each other.
5 min read
 Projects
3D Printing Projects for Kids: 15 Easy Ideas
Fifteen easy 3D printing projects kids can design themselves, from name tags and dice to cookie cutters, pen pots and a little train.
6 min read
Projects
3D Printing Projects for Kids: 15 Easy Ideas
Fifteen easy 3D printing projects kids can design themselves, from name tags and dice to cookie cutters, pen pots and a little train.
6 min read
 Projects
Make a Name Keychain, Step by Step
Design your own name keychain in Kids 3D Lab — a tag, your name on top and a hole for the ring — then get it ready for a 3D printer.
6 min read
Projects
Make a Name Keychain, Step by Step
Design your own name keychain in Kids 3D Lab — a tag, your name on top and a hole for the ring — then get it ready for a 3D printer.
6 min read