Blog ›
Make Your Own Cookie Cutter
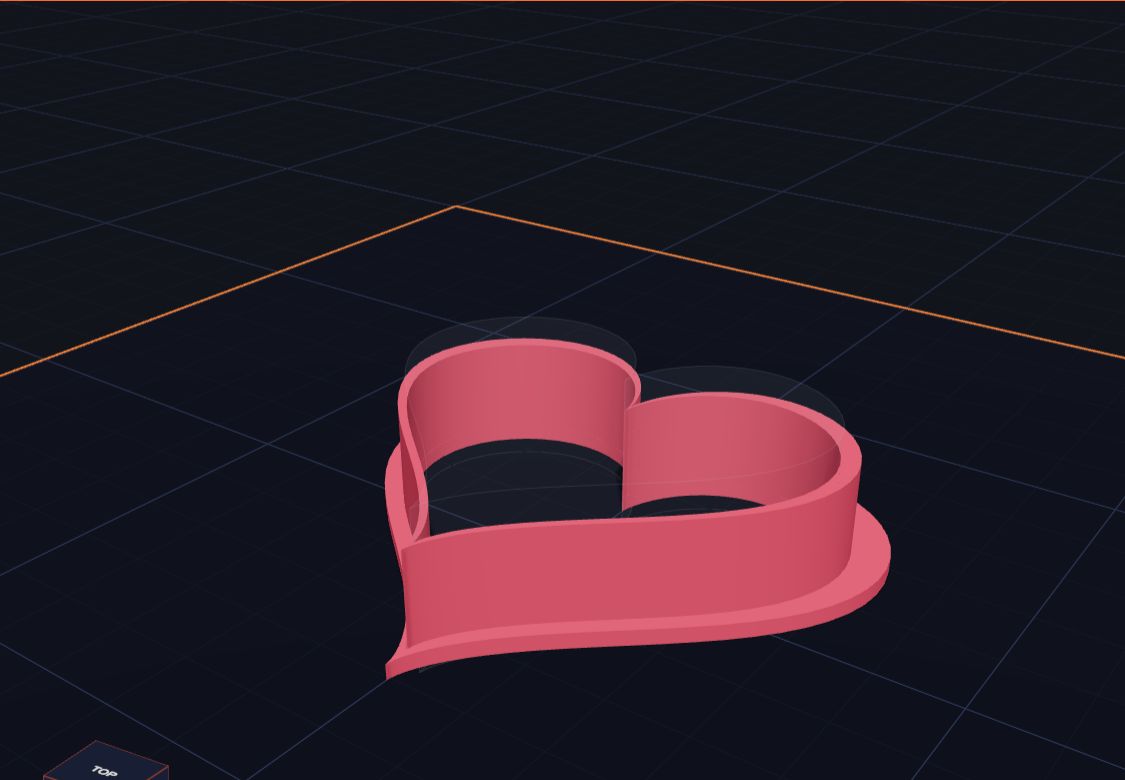
What's better than cookies? Cookies in a shape you designed! In this lesson you will make a heart cookie cutter. Then you'll learn how to make a star, a cloud, or any shape you can draw.
A cookie cutter is a thin wall in the shape of your cookie, with a wider rim so it's comfortable to press. You'll make it from two hearts and one heart-shaped hole.
How a cookie cutter works
Look at a real cookie cutter. It has two parts:
- The cutting wall. It's thin, so it cuts the dough cleanly.
- The rim. It's wider, so it doesn't hurt your hand when you press.
When we print it, the rim lies flat on the printer's plate, and the wall stands up. When you use it, you turn it over: the thin wall goes into the dough, and your hand presses on the rim.
Step 1: The big heart
- Click New build.
- Find Heart in the Cut-out shapes list and click it.
- Set its Width to 60 and its Height to 14.
- Pick pink, red or any colour.
This heart will become the cutting wall. It's 14 mm tall, which is deep enough for most cookie dough.
Step 2: The hole
Now we scoop out the middle, so only a thin wall is left.
- Add another Heart. Set its Width to 56 and its Height to 20.
- Click Hole, or press H. It turns grey.
- Click the big heart. Hold Shift and click the hole.
- Click Cut through the heart. The hole goes all the way through.
- Make sure the hole sits right in the middle. Pick both and use Line up with the middles if you need to.
The big heart is 60 wide and the hole is 56 wide. That leaves a wall about 2 mm thick.
Step 3: The rim
- Add a third Heart. Set its Width to 68 and its Height to 2.
- Make it the same colour.
- Put it in the middle, under the big heart, flat on the plate.
Now the hole cuts through the rim too, because it's taller than everything. You have a heart-shaped ring with a flat lip. That's a cookie cutter!
Step 4: Check it
Press F to see the whole thing. Turn the view with the right mouse button and look from underneath. You should see all the way through the middle.
Then click Export. In Ready to print?, check that it's all one piece and that nothing is floating.
More shapes to try
Every cut-out shape works the same way: a big one, a slightly smaller hole in the middle, and a wider flat one for the rim.
| Shape | Big one | Hole | Rim |
|---|---|---|---|
| Star | 60 wide | 56 wide | 68 wide |
| Cloud | 60 wide | 56 wide | 68 wide |
| Moon | 60 wide | 56 wide | 68 wide |
| Circle (Cylinder) | 60 wide | 56 wide | 68 wide |
Draw your own cookie shape
Want a cookie shaped like your cat, or the first letter of your name?
- Click Draw your own in the Shapes list.
- Draw your shape with the Pencil. Let go, and the ends join up.
- Set the Thickness to 14 and click Put it on the plate.
- Make a copy with Ctrl + D, make it a little smaller, and click Hole.
- Add a thin rim underneath, just like before.
Simple, round shapes work best. Very thin parts, like a cat's whiskers, won't cut well in dough.
Common mistakes
- The hole doesn't go all the way through. Make the hole taller than everything, and use Cut through.
- The wall is too thin. Walls thinner than about 1.5 mm can break. Make the hole a little smaller.
- The rim is floating. The rim must sit on the plate, touching the bottom of the wall.
- The hole isn't in the middle. Then one side is thick and one is thin. Use Line up.
Using your cookie cutter safely
3D prints have tiny grooves between the layers, where bits of dough can get stuck. So:
- Ask a grown-up to help.
- Wash it by hand in warm (not hot) soapy water. Hot water and dishwashers can bend PLA plastic.
- Use it for cutting only, and don't leave it in the dough.
- Many people use a printed cutter for a special day, then print a fresh one next time.
Read Is 3D Printing Safe for Kids? for more.
Questions kids ask
Why is the rim wider than the wall?
So it's comfortable to press with your hand, and so the cutter stands flat on the printer's plate.
Can I cut play dough too?
Yes! Play dough is a great way to test your cutter before using real cookie dough.
How big can my cookie be?
As big as your printer's plate. But big cutters use more plastic and take longer to print. 60 to 80 mm is a good cookie size.
Can I put a face on my cookie?
A cutter only cuts the outline. To press a face into the cookie, you would need a second tool called a stamp. That's a great next project!
For grown-ups
The cookie cutter is a lovely project for thinking about offsets: the wall thickness is half the difference between the outer and inner widths. Ask your child to work it out before they check it. It's also a good real-world design problem with a clear test: does it cut dough cleanly? If not, what would you change? For food use, printed cutters are best treated as short-use items, washed by hand and replaced often. Use PLA, and let a grown-up decide what's right for your kitchen.
Keep reading
 What Is CAD? Explained for Kids
CAD means computer-aided design. Learn what CAD is, who uses it, how it helps make cars, phones and toys, and how you can start doing CAD today.
5 min read
What Is CAD? Explained for Kids
CAD means computer-aided design. Learn what CAD is, who uses it, how it helps make cars, phones and toys, and how you can start doing CAD today.
5 min read
 What Is 3D Printing?
A 3D printer makes real things you can hold, one thin layer at a time. Here is how it works, in simple words.
5 min read
What Is 3D Printing?
A 3D printer makes real things you can hold, one thin layer at a time. Here is how it works, in simple words.
5 min read
 Make Your First 3D Model in 10 Minutes
A step-by-step guide to your very first 3D model — a name tag with your own name on it.
5 min read
Make Your First 3D Model in 10 Minutes
A step-by-step guide to your very first 3D model — a name tag with your own name on it.
5 min read