Make a Robot Friend From Shapes
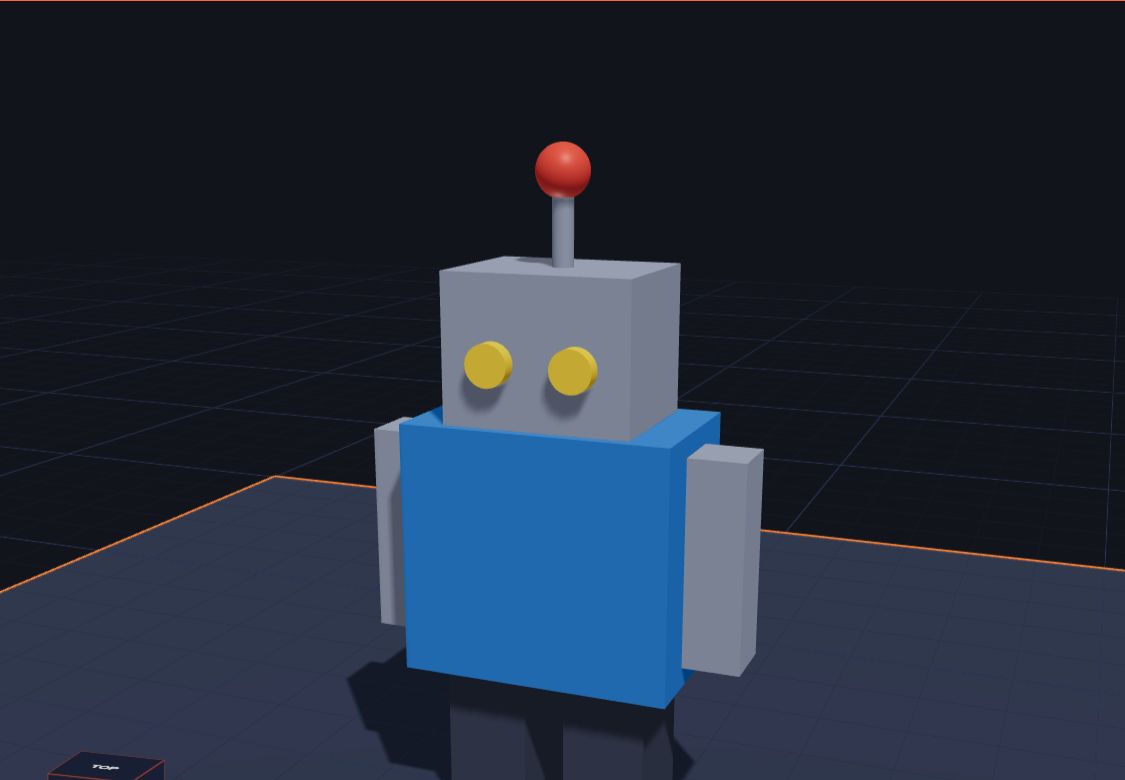
Beep boop! Robots are brilliant to build in 3D, because they are made almost entirely of boxes. If you can stack blocks, you can build a robot.
In this project you will build a robot with two legs, a body, two arms, a square head, glowing eyes and an antenna. You'll learn how to stack shapes neatly, how to paint each part, and how to group the parts so your robot moves as one. It takes about 20 minutes.
What you need
- Kids 3D Lab (free, no account needed)
- About 20 minutes
- Your imagination: every robot is different!
Step 1: The legs
- Open Kids 3D Lab and click New build.
- Click Box. Set Width 8, Depth 10 and Height 16.
- Pick dark grey.
- Under Position, set X to -6. This is the left leg.
- Press Ctrl + D (on a Mac, ⌘ + D) to copy it, and set the copy's X to 6. That's the right leg.
Two legs, standing side by side, with a little gap between them.
Step 2: The body
- Click Box. Set Width 26, Depth 16 and Height 24.
- Pick blue.
- Set X to 0 and Y to 0, and set Z to 16.
Why 16? Because the legs are 16 tall. Z is how high the bottom of a shape is above the plate. Setting the body's Z to 16 puts it exactly on top of the legs.
Step 3: The arms
- Click Box. Set Width 6, Depth 6 and Height 20.
- Pick light grey.
- Set X to -15.5 and Z to 18.
- Copy it with Ctrl + D, and set the copy's X to 15.5.
The arms hang down at each side of the body. They overlap the body by a tiny bit, so they stay joined when printed.
Step 4: The head
- Click Box. Set Width 18, Depth 14 and Height 14.
- Pick light grey.
- Click the body, hold Shift, click the head, and click Put on top of the box.
The head jumps right on top of the body, in the middle. Its Z is now 40: the legs (16) plus the body (24).
Step 5: Eyes and antenna
Eyes:
- Click Cylinder. Set Diameter 4 and Height 2.
- Under Turn, set X to 90, so it faces the front.
- Pick yellow.
- Set X to -4, Y to -7.5 and Z to 44.
- Copy it, and set the copy's X to 4.
Antenna:
- Click Cylinder. Set Diameter 2 and Height 7. Put it on top of the head.
- Click Ball. Set Diameter 5 and pick red. Put it on top of the antenna.
Your robot is complete! Hold the right mouse button and drag to walk around it.
Step 6: Group it
Right now your robot is ten separate pieces. If you drag the body, the legs stay behind! Let's fix that.
- Press Ctrl + A to pick everything.
- Click Group them (or press Ctrl + G).
Now your robot moves, turns and copies as one. Click Ungroup if you want to change one part again.
Practice gameGroup themMake the parts of a car move as one.Play →Step 7: Save it
Call your build "My robot", click Save, then Export when you're ready to print. Pick Download 3MF to keep all the colours.
Paint your robot
Colour makes a robot come alive. Pick any part and choose a new colour in Colour. Click the rainbow circle at the end for lots more colours — or any colour at all.
Ideas:
- Rusty robot: orange-brown body and grey arms.
- Space robot: white with blue eyes.
- Rainbow robot: a different colour for every part!
Make it even better
Give it a face
Add a thin Box under the eyes for a mouth. Or turn a small Moon into a smile. You could even cut the mouth in with a Hole.
Claws or hands
Put a small Ball or a Donut at the bottom of each arm. A donut turned on its side looks like a robot claw.
Wheels instead of legs
Delete the legs. Add four Cylinders turned on their sides (Turn Y 90) as wheels, like a little rover.
A robot army
Group your robot, then press Ctrl + D a few times. Make each copy a different colour. Now you have a robot team!
Common mistakes
- Parts are floating. Every part must touch another part. Check the Z numbers, or use Put on top of….
- The head is off to one side. Use Put on top of the box, which puts it in the middle.
- Dragging moves only one part. Group the robot first.
- The antenna is too thin. A 2 mm antenna can snap when printed. Make it 3 mm if it will be played with.
Questions kids ask
Can my robot move?
Your printed robot is a statue, so it can't walk. But you could design arms that turn, using a Screw shape as a joint. That's an advanced project!
How do I make it print in colours?
Download the 3MF file. A printer that prints many colours can use it. With a one-colour printer, you can paint the printed robot with acrylic paint.
What's the biggest robot I can make?
As big as your printer's plate! The Ready to print? box tells you if it fits.
Can I use other shapes?
Of course! Try a Ball head, Cylinder legs or a Dome on top. Robots can look like anything.
For grown-ups
This project is all about placing parts precisely: the Z value of each part is the sum of the heights below it, which is lovely, practical arithmetic. Grouping introduces a key idea in design software: treating many parts as one object. If you print it, the arms join the body only along a thin strip, so print slowly, and consider making the arms touch the body more. The robot is one of the app's ready-made examples, so your child can open it, take it apart and rebuild it their own way. For a similar build, see Design Your Own Toy Car.
Keep reading
 Projects
Build a Snowman by Stacking Shapes
Stack three balls, add a carrot nose and a hat. A fun first project that teaches you how to put shapes on top of each other.
5 min read
 Projects
3D Printing Projects for Kids and Students: 15 Easy Ideas
Fifteen easy 3D printing projects and ideas for kids and students, from name tags and dice to cookie cutters and pen pots — plus STEM projects for school.
7 min read
 Projects
How to Make a 3D Printed Name Keychain, Step by Step
How to make a 3D printed name keychain, step by step — a tag, your name on top and a hole for the ring — designed free in Kids 3D Lab and ready for a 3D printer.
7 min read