Design a Christmas Ornament You Can Print

Decorating the tree is one of the best parts of the holidays. This year, you can hang something you designed yourself! A homemade ornament is also a lovely present: put a name on it, and it becomes a gift that someone will keep for years.
In this project you will make a golden star ornament with a smaller star on top and a loop for the string. Then you'll learn how to add names and make other shapes, like a bauble or a snowflake. It takes about 15 minutes.
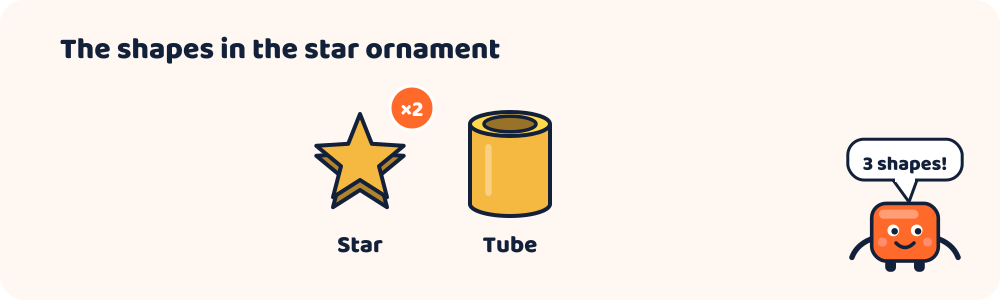
What you need
- Kids 3D Lab (free, no account needed)
- About 15 minutes
- A piece of ribbon or string, for hanging it up
What makes a good ornament?
Before we start, let's think about the design. A good tree ornament is:
- Light, so it doesn't bend the branch. That means thin and flat.
- Strong, so it doesn't snap when it's packed away. Not too thin!
- Easy to hang, with a loop or a hole for the string.
- Pretty from the front, because that's the side people see.
Our star does all four.
Step 1: The big star
- Open Kids 3D Lab and click New build.
- Click Star in the Cut-out shapes.
- Set Diameter to 56 and Height to 4.
- Pick a gold colour.
This star is about as wide as the palm of your hand, and 4 mm thick: light, but strong.
Step 2: The small star on top
- Click Star again.
- Set Diameter to 34 and Height to 2.
- Pick a bright yellow.
- Click the big star, hold Shift, and click the small star.
- Click Put on top of the star.
The small star sits right in the middle of the big one. Now set its Z to 3.5, so it sinks a tiny bit into the big star and joins it firmly.
The two layers make your ornament look three-dimensional and sparkly, even though it's mostly flat.
Step 3: The loop for the string
- Click Tube in the Shapes list. A tube is a cylinder with a hole down the middle.
- Set Diameter to 11, Wall to 2.5 and Height to 4.
- Pick the same gold as the big star.
- Under Position, set X to 0, Y to 28 and Z to 0.
The loop sits at the top point of the star, overlapping it a little. Now there's a hole to thread your ribbon through.
Step 4: Check it and save it
- Call your build "Star ornament".
- Click Save.
- Click Export, and read the checks in Ready to print? Is it all one piece?
- Click Download STL, or Download 3MF to keep both colours.
Make it even better
Add a name
- Click Text. Type a name, like "GRANDMA" or "2026".
- Set Letter size to 6 and Thickness to 1.5.
- Put it on top of the small star.
Short names fit best. For long names, make the star bigger, or put the name on a separate strip below the star.
A round bauble
- Click Cylinder. Set Diameter 50 and Height 3. It's a flat disc.
- Add a Tube loop at the top, just like before.
- Decorate the front with small Stars, Hearts or Balls, 1.5 mm high.
A snowflake
Real snowflakes have six arms. Make one thin Box (50 long, 4 wide, 3 high). Copy it twice, and turn the copies to Turn Z 60 and 120. That's three bars crossing in the middle: six arms! Add small boxes to the arms for branches.
A Christmas tree
Stack three Triangles of different sizes, pointing up, with a small Box for the trunk. Add a tiny Star at the top and a loop.
One for everyone
Make one ornament, then group it with Ctrl + A and Ctrl + G. Copy it for each person in your family, and change the name on each copy. A perfect set of presents!
Common mistakes
- The loop is too small. A loop smaller than about 8 mm is hard to thread. Keep it 10 mm or more.
- The loop doesn't touch the star. It must overlap the star a little, or it will fall off when printed.
- It's too thin. Less than 3 mm thick can snap. 4 mm is a good size.
- The name hangs off the edge. Make the letters smaller, or the star bigger.
Questions kids ask
How do I hang it?
Thread a ribbon or a piece of string through the loop and tie a knot. Gold or red ribbon looks great.
Can I make one for each person in my family?
Yes! Make one, copy it, and change the name on each copy. You can even print them all at the same time, side by side on the printer's plate.
What colour plastic should I use?
Gold, silver, red, green and white all look festive. Some plastics even sparkle or glow in the dark!
How long does it take to print?
A flat ornament like this prints quite quickly, usually in under an hour. The slicer app shows the exact time.
For grown-ups
Ornaments are an ideal first print: flat, quick and forgiving. They also introduce real design constraints, like weight, strength and a hanging point, in a project with a happy ending. If you're making several as gifts, print them together on one plate to save time. Glitter or silk PLA makes them look extra special. Plan ahead: allow time for printing before the holidays, especially if you're using a library or school printer. For more gift ideas, see Gifts Kids Can Design and 3D Print, and for adding names, see Make a Name Keychain.
Keep reading
 Holidays
Make a Jack-o'-Lantern for Halloween in 3D
Design a 3D jack-o'-lantern in Kids 3D Lab — a round pumpkin, a stalk, and a spooky face cut out with holes. An easy Halloween project for kids.
7 min read
 Maths & science
X, Y and Z: How 3D Space Works
Every 3D model lives in a space with three directions — X, Y and Z. Learn what they mean, how numbers tell a shape where to go, and practise in Kids 3D Lab.
8 min read
 App skills
Free 3D Design for Kids on a Tablet, iPad or Chromebook
Can kids do 3D design on a tablet? Yes — free, in the browser, with no app to install and no sign-up. Touch controls for iPad, Android tablets and Chromebooks, saving tips and quick fixes.
7 min read